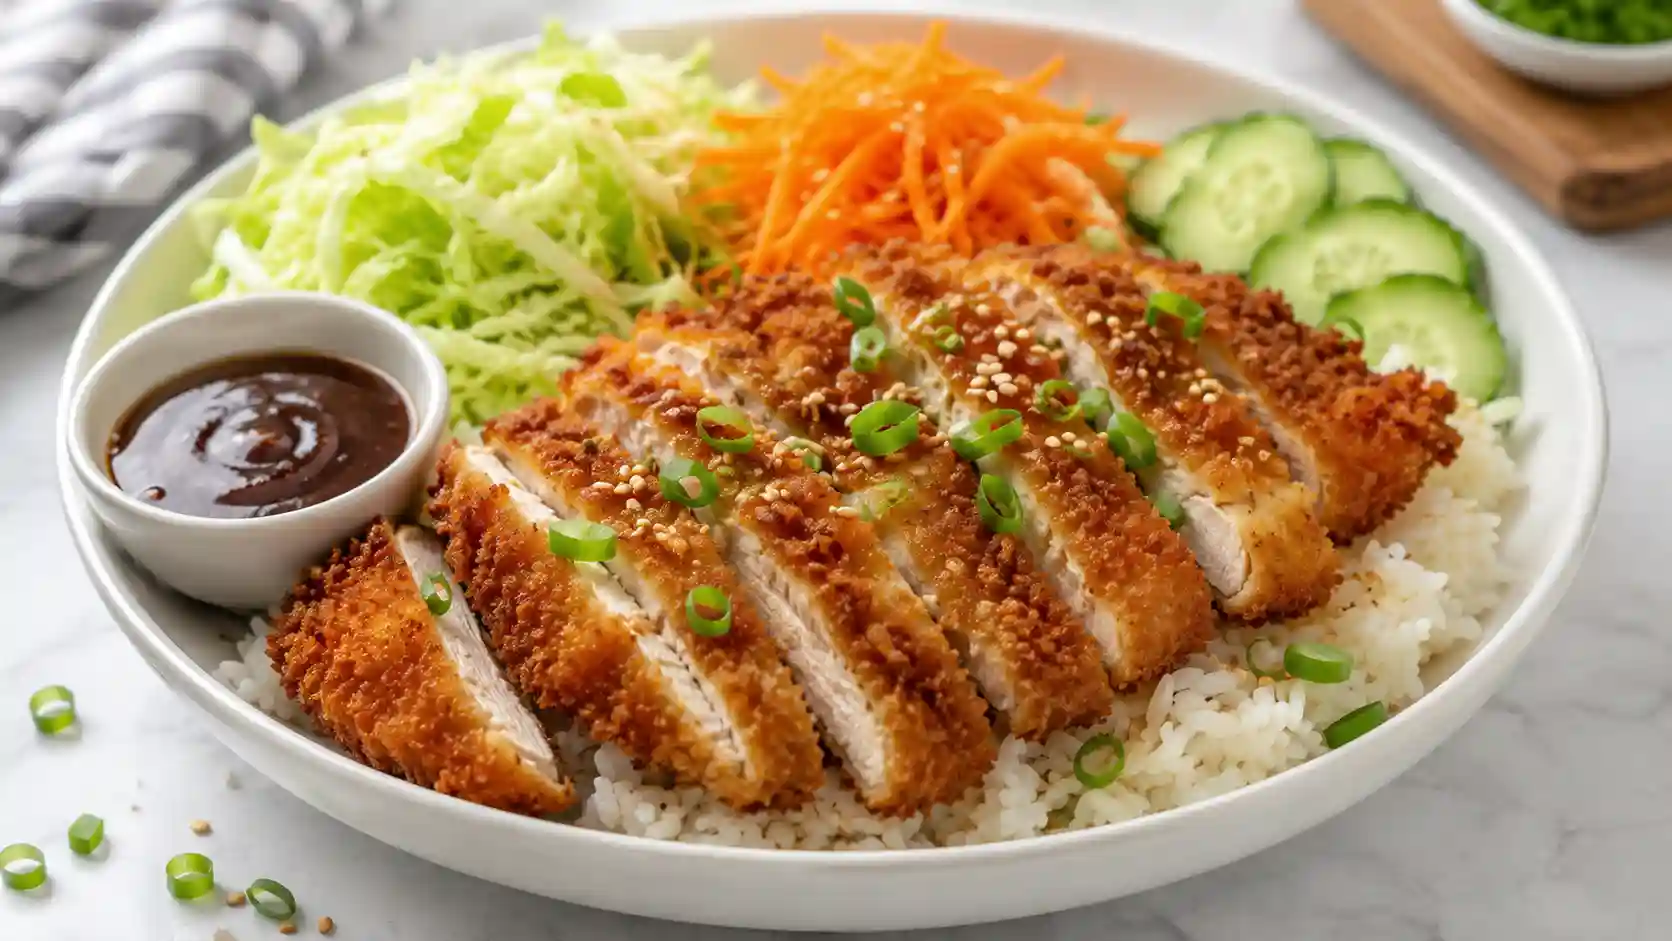
This chicken katsu rice bowl brings together everything you want in a satisfying meal: crispy golden panko chicken, fluffy rice, crunchy fresh vegetables, and a tangy katsu-style sauce. The key to making it work as a bowl, and especially as a meal prep bowl, is keeping the crispy chicken away from wet ingredients until the moment you eat. Once you get that part down, this becomes one of the more repeatable bowls in your weekly rotation.
If you enjoy saucy chicken rice bowls alongside crispy ones, the teriyaki chicken rice bowl is another easy weeknight option worth bookmarking.
Quick Recipe Snapshot
| Component | Details |
|---|---|
| Main Protein | Chicken breast, chicken thighs, or chicken tenders |
| Base | White rice, jasmine rice, brown rice, or leftover rice |
| Breading | Flour, egg, panko breadcrumbs |
| Vegetables | Shredded cabbage, carrots, cucumber, green onions, edamame, or avocado |
| Sauce Style | Katsu-style sauce: Worcestershire, ketchup, soy sauce, brown sugar, garlic powder |
| Toppings | Sesame seeds, sliced green onions, optional chili flakes or sriracha |
| Meal Prep Note | Store chicken separately from rice and wet vegetables; keep sauce in a small cup on the side |
Why You’ll Like This Chicken Katsu Rice Bowl
There are a few things that make this bowl stand out from a standard chicken and rice meal.
- Crispy panko chicken. Panko breadcrumbs create a lighter, crunchier coating than standard breadcrumbs. The texture contrast between the crispy chicken and soft rice is a big part of what makes this bowl satisfying.
- Fluffy rice base. White rice, jasmine rice, brown rice, leftover rice, or a microwave pouch all work here. The rice is a neutral base that lets the chicken and sauce do the heavy lifting on flavor.
- Crunchy vegetables. Shredded cabbage, sliced carrots, cucumber, edamame, and green onions all add freshness and crunch without requiring any cooking. They balance the richness of the crispy chicken well.
- Sauce on the side. The katsu-style sauce goes on right before eating, not packed over the chicken. This is the single most important detail for keeping the bowl enjoyable as a leftover.
- Lunch or dinner. This bowl works just as well packed for lunch as it does served fresh for dinner. It fits naturally into a high protein lunch ideas rotation.
- Meal prep with texture in mind. With a little planning around how you pack the components, this bowl holds up well for 3 to 4 days. The texture precautions are straightforward once you know what to keep separate.
Ingredients You’ll Need
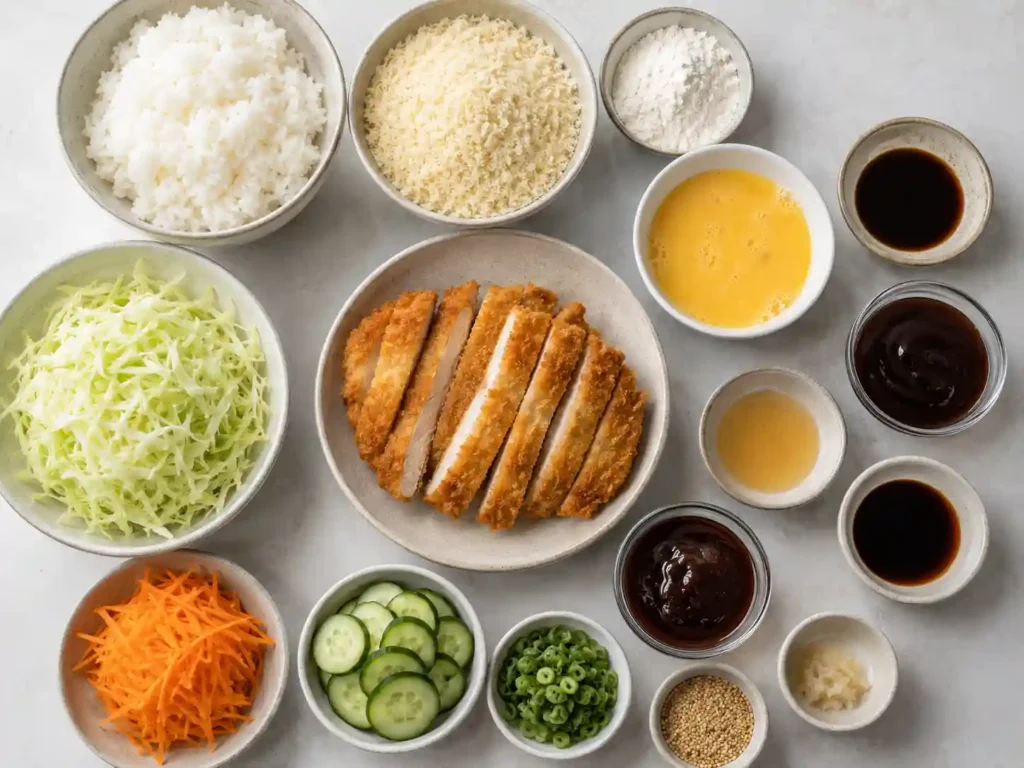
Chicken
- Boneless, skinless chicken breast, chicken thighs, or chicken tenders
- Chicken should be sliced thin or pounded to an even thickness for consistent cooking
Rice
- Long-grain white rice, jasmine rice, or brown rice
- Leftover cooked rice or microwave rice pouches also work well
Panko Breading
- All-purpose flour
- Eggs, beaten
- Panko breadcrumbs
- Salt and black pepper
- Garlic powder or onion powder (optional, stirred into the flour or panko)
Vegetables
- Shredded green cabbage or napa cabbage
- Sliced or shredded carrots
- Sliced cucumber
- Green onions, sliced thin
- Edamame (shelled, thawed from frozen)
- Avocado (add fresh at serving, not during meal prep)
Katsu-Style Sauce
- Worcestershire sauce
- Ketchup
- Soy sauce
- Brown sugar
- Garlic powder
- A small splash of rice vinegar or apple cider vinegar for brightness (optional)
Toppings
- Sesame seeds
- Sliced green onions
- Optional: sriracha, chili garlic sauce, or chili flakes
Budget-Friendly Ingredient Notes
This bowl uses affordable, widely available ingredients. Here is how to make practical choices at the store.
Chicken: Chicken breast, chicken thighs, and chicken tenders all work. Tenders are already thin and require minimal prep. Chicken thighs tend to be less expensive than breast and stay juicy even when cooked at the heat needed to crisp the breading. Chicken breast works well when sliced thin or pounded to an even thickness before breading. Buy whichever cut is on sale this week.
Rice: White rice and jasmine rice are the most affordable options and cook quickly. Brown rice adds more chew and a nuttier flavor but takes longer. Leftover rice from a previous meal saves time. Microwave rice pouches are a solid shortcut when you only need a serving or two.
Panko breadcrumbs: Panko is now widely available at most US grocery stores, often in the Asian foods aisle or the baking aisle. It creates a noticeably lighter and crunchier coating than standard breadcrumbs. A single canister goes a long way across multiple batches.
Vegetables: Shredded cabbage and carrots are typically among the more affordable vegetables and add crunch without cooking. A bag of pre-shredded coleslaw mix covers both and saves prep time. Cucumber, green onions, and edamame are all low-cost additions. Avocado works well but should be added fresh at serving rather than packed into meal prep containers.
Katsu-style sauce: Worcestershire sauce, ketchup, soy sauce, and brown sugar are all common pantry staples most US kitchens already have. The sauce comes together in less than two minutes and stores well in a sealed container in the refrigerator for several days.
How to Make a Chicken Katsu Rice Bowl
Prepare the Rice
Cook rice according to package directions. If using leftover rice, break it up and reheat it while you work on the chicken. If using a microwave rice pouch, save that step for last so the rice is warm when the bowls are built.
Slice or Flatten the Chicken
This step matters more than most people expect. Chicken that is too thick will take too long to cook through at the heat needed to crisp the panko, which can leave the outside overcooked and the inside underdone. Slice chicken breast horizontally into thinner cutlets, or place each piece between two sheets of plastic wrap and pound to an even thickness with a meat mallet or the bottom of a heavy pan. Chicken tenders are already the right thickness and can go straight to breading.
Set Up the Breading Station
Arrange three shallow bowls in a line: one with flour seasoned with salt, pepper, and optional garlic powder; one with beaten eggs; and one with panko breadcrumbs. Use shallow breading bowls or rimmed plates so the coating process stays clean and even. Having everything set up before you start keeps the process moving and prevents clumping from wet hands touching dry ingredients out of order.
Coat the Chicken
Working one piece at a time, press each chicken piece into the flour and shake off the excess. Dip it in the beaten egg, letting any excess drip off. Press it firmly into the panko on both sides, making sure the coating covers all surfaces. Press gently so the panko adheres rather than just resting loosely on the surface. Set each breaded piece on a clean plate or wire rack while you finish the rest.
Cook Until Crispy and Safe
Heat a generous amount of neutral oil in a heavy skillet or nonstick skillet over medium to medium-high heat. The oil should be hot enough that a pinch of panko dropped in sizzles immediately. If the oil is too cold, the breading absorbs it and turns greasy instead of crispy. If the oil is too hot, the panko will brown before the chicken is cooked through.
Cook the chicken in batches without crowding the pan. Flip once when the bottom is deep golden brown. Cook until the chicken registers at least 165°F / 74°C on an instant-read thermometer. Transfer to a wire rack if you have one, rather than a paper towel-lined plate. A wire rack lets air circulate underneath and keeps the bottom crust from steaming and softening.
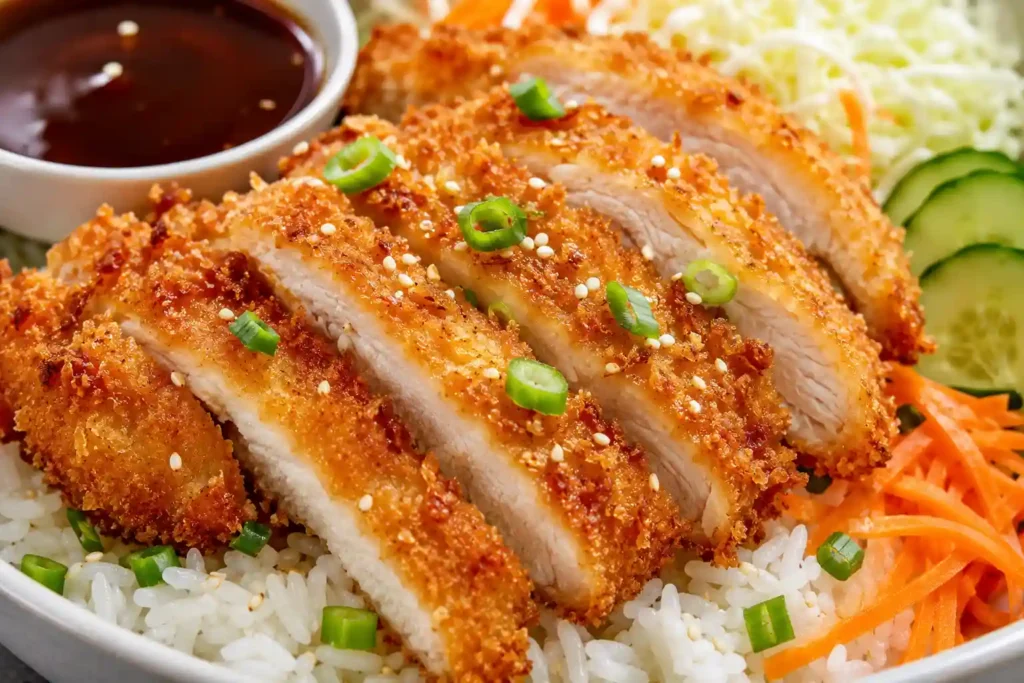
Slice the Katsu
Let the chicken rest for a couple of minutes before slicing. Cut across the grain into strips. Slicing just before serving preserves the most texture. If you are meal prepping, keep the pieces whole or wait to slice until just before eating.
Build the Bowls
Add a scoop of rice to each bowl. Arrange the vegetables alongside or in a section of the bowl. Place the sliced katsu chicken on top. Drizzle or serve the katsu-style sauce on the side rather than pouring it directly over the breading. Finish with sesame seeds, green onions, and any other toppings.
How to Keep Chicken Katsu Crispy in a Rice Bowl

Crispy breading and wet bowl components do not naturally get along. Here is how to handle that gap.
- Rest on a wire rack after cooking. Placing hot fried chicken directly on a plate traps steam underneath and softens the bottom crust quickly. A wire rack, even a small one set over a baking sheet, makes a real difference.
- Slice just before serving. Cutting the katsu reveals the juicy interior, which can release steam and moisture into the breading. Slice right before eating rather than during prep whenever possible.
- Keep sauce separate until eating. Katsu sauce is tangy and liquid. Pouring it over the chicken during meal prep or too early at serving will soften the breading within minutes. Serve it on the side or in a small sauce cup and pour right before eating.
- Keep watery vegetables away from the breading. Cucumber, cabbage with dressing, and any vegetables that release moisture should be placed in a separate section of the bowl rather than underneath or in direct contact with the chicken.
- Place chicken on top. The chicken should sit on top of the rice and vegetables, not buried underneath them. This keeps it from sitting in moisture that rises from the warm rice.
- Reheat with dry heat when possible. An oven, toaster oven, air fryer, or skillet will restore more crunch than a microwave. A microwave heats with steam internally and tends to soften breading significantly. Note that the chicken will not return to its just-fried texture, but dry heat comes closer than microwave reheating.
How to Meal Prep Chicken Katsu Rice Bowls
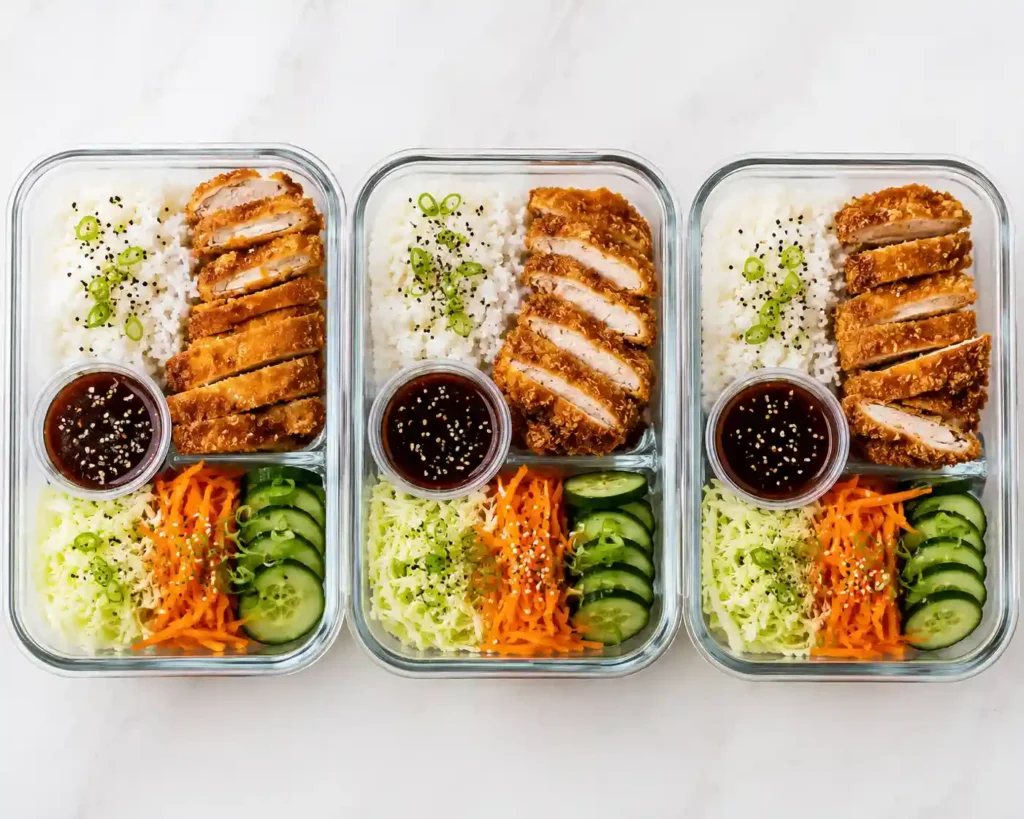
This bowl requires a little more planning than a sauced chicken bowl because the crispy texture is part of what makes it appealing. Here is how to set it up so it holds up through the week.
What to pack together: Cooked rice and raw or lightly dressed vegetables can go into the same container. They tolerate each other well and do not affect each other’s texture significantly during storage.
What to store separately: The crispy chicken should always be stored in its own separate container, not on top of warm rice or wet vegetables. Keeping it separate means it stays drier and reheats better. For more ideas on structuring a full prep routine affordably, check out this guide to cheap high protein meal prep.
Why sauce should stay separate: Even a small amount of katsu sauce softens panko breading quickly. Store sauce in a small sealed container or sauce cup and add it right before eating.
Why fresh toppings should stay separate: Green onions, sesame seeds, avocado, and cucumber lose their texture and freshness when stored in contact with warm rice or cooked components. Keep them in a small bag or separate container and add them at serving.
How to reheat the chicken for better texture: Reheat the chicken in an air fryer, toaster oven, or conventional oven at a moderate temperature until it reaches 165°F / 74°C. This method restores more of the crust than microwaving. Reheat the rice and vegetables separately in the microwave while the chicken reheats in the oven or air fryer.
Why microwave reheating softens the breading: Microwave ovens heat food by exciting water molecules, which creates steam inside the breading and softens it. If a microwave is your only option, reheat on medium power and keep the time short. The texture will not match fresh, but it is still a functional meal.
If you are planning lunches across a full week, high protein lunch ideas has additional bowl and prep options worth looking at alongside this one.
Sauce Options for Chicken Katsu Bowls
The sauce is a key part of what makes a katsu bowl feel complete. Here are a few approaches.
Simple katsu-style sauce: Whisk together Worcestershire sauce, ketchup, soy sauce, brown sugar, and garlic powder in a small bowl. Taste and adjust the balance between sweet and savory. This sauce has a tangy, slightly sweet flavor that works well with the crispy chicken and plain rice. A small splash of rice vinegar or apple cider vinegar can brighten it further if you like a bit more acidity.
Spicy katsu-style sauce: Add sriracha, chili garlic sauce, or a pinch of cayenne to the base sauce. Start with a small amount and adjust to your heat level. This version works well for bowls where you want more of a kick without changing the overall sauce character.
Creamy drizzle: A simple mix of mayonnaise and sriracha, sometimes called spicy mayo, works as a secondary drizzle alongside the katsu sauce. Keep it light so it does not overwhelm the bowl. Drizzle just before serving.
Sauce on the side for meal prep: Regardless of which sauce you make, always store it in a separate small container when meal prepping. Pour it over the bowl right before eating. This single habit makes the biggest difference in texture between a meal prep bowl that is enjoyable and one that is soggy.
Easy Variations
Baked Option
To bake instead of fry, place breaded chicken pieces on a wire rack set over a baking sheet. Spray or brush the panko coating with a neutral oil before baking. Bake at a high temperature until the chicken is cooked through and the breading is golden. The crust will not be identical to pan-fried, but it is a lower-oil option that still produces a reasonable crunch. Make sure the chicken still reaches 165°F / 74°C. An air fryer produces a result closer to pan-fried than a standard oven does.
More Vegetables
Double the vegetable portion and reduce the rice if you prefer a lighter base. Shredded cabbage, edamame, snap peas, and julienned carrots all bulk up the bowl without much additional prep. Roasted broccoli or roasted sweet potato can also work as a warm vegetable addition alongside the fresh crunchy ones.
Spicy Sauce
Add chili garlic sauce, sriracha, or red pepper flakes to the katsu-style sauce before serving. A spicy mayo drizzle alongside the katsu sauce gives the bowl two sauce layers that balance well against the crispy chicken and plain rice.
Leftover Rice Shortcut
Day-old rice works well here and is often available if you cook rice regularly. Cold leftover rice reheats cleanly in the microwave with a small splash of water to prevent it from drying out. It also works as a base for a quick pan-fried rice if you want to add extra flavor to the base.
Extra Crunchy Cabbage Bowl
For maximum texture contrast, use a generous base of freshly shredded green cabbage dressed lightly with rice vinegar, a pinch of sugar, and sesame oil rather than cooked rice as the primary base. Add a smaller amount of rice on top of the cabbage, then layer the sliced katsu chicken over everything. The crunchy cabbage underneath the rice and chicken adds a second texture layer that makes the bowl feel more dynamic.
What to Serve With It
This bowl is a complete meal on its own, but a few simple additions round it out if you want more variety at the table.
- Miso soup as a light side, if you have miso paste on hand
- A simple cucumber salad dressed with rice vinegar, a pinch of sugar, and sesame seeds
- Steamed or blanched edamame in the shell as a simple side
- A soft-boiled egg sliced in half and placed on top of the bowl for extra richness
- A side of pickled vegetables for brightness and contrast with the fried chicken
Storage and Reheating
Food safety first: Cook chicken to an internal temperature of at least 165°F / 74°C and verify with an instant-read thermometer, especially with thicker pieces or when using bone-in cuts. When reheating leftovers, bring the chicken back to at least 165°F / 74°C before eating.
Refrigerator: Store the crispy chicken, cooked rice, and vegetables in separate airtight containers. Cooked leftovers can generally be kept 3 to 4 days in the refrigerator when stored properly. Keep the sauce and any fresh toppings like avocado, cucumber, or sliced green onions in their own small containers.
Freezer: Cooked chicken and rice can generally be frozen for up to 3 to 4 months when stored properly. Frozen leftovers can lose texture, and crispy panko breading in particular tends to soften significantly after freezing and thawing. Thaw overnight in the refrigerator before reheating.
Reheating the chicken: For the best texture, reheat the chicken in an air fryer, toaster oven, or conventional oven until it reaches 165°F / 74°C throughout. If you only have a microwave, reheat on medium power in short intervals and accept that the breading will be softer. Reheat rice separately with a small splash of water and a loose cover.
Crispy breading after refrigeration: Some softening of the breading is expected after refrigeration. Dry-heat reheating helps recover some of the crust, but the chicken will not return to its just-fried texture. This is normal and does not affect safety or flavor.
Common Mistakes to Avoid
- Chicken too thick. Thick, uneven chicken pieces cook inconsistently. The outside breading can burn before the inside reaches safe temperature. Slice or pound to an even thickness before breading.
- Breading falling off. This usually happens when the flour step is skipped or rushed. The flour gives the egg something to cling to, and the egg gives the panko something to stick to. Press the panko firmly onto each piece so it adheres rather than sitting loosely.
- Oil too cold. Cold oil leads to greasy, soggy breading. The panko absorbs oil instead of crisping in it. Test the oil temperature before adding the chicken; a pinch of panko should sizzle immediately when dropped in.
- Oil too hot. Very high heat browns the panko quickly on the outside while leaving the chicken undercooked inside. Medium to medium-high heat gives the chicken time to cook through while the breading crisps evenly.
- Sauce added too early. Pouring katsu sauce over the chicken well before serving softens the breading. Add sauce right before eating, not during assembly or packaging.
- Watery vegetables touching the breading. Cucumber, dressed cabbage, or any wet vegetable placed directly under or against the crispy chicken releases moisture into the breading. Keep wet ingredients in a separate section of the bowl.
- Microwave-only reheating when texture matters. Microwave reheating steams the breading from the inside and softens it significantly. Use dry heat when possible for a better result.
- Packing sauce directly over the crispy chicken. Even a well-thickened sauce will eventually soften panko breading during storage. The sauce container should always travel separately.
- Expecting the bowl to stay crispy for days. Panko breading is best freshly cooked. Meal prepped bowls are still good and practical, but the breading will soften during storage. Plan your expectations around this and use dry-heat reheating to help.

Chicken Katsu Rice Bowl
Ingredients
Equipment
Method
- Cook the rice according to package directions. If using leftover rice, break it up and reheat it with a small splash of water until fluffy and steaming.
- Slice chicken breast horizontally into thin cutlets, or pound chicken pieces to an even thickness. Chicken tenders can usually go straight to breading.
- Set up three shallow bowls. Add flour, salt, black pepper, garlic powder, and onion powder to the first bowl. Add beaten eggs to the second bowl. Add panko breadcrumbs to the third bowl.
- Coat each chicken piece in the flour mixture and shake off the excess. Dip into the beaten egg, then press firmly into the panko breadcrumbs until evenly coated on both sides.
- Heat the neutral oil in a large skillet over medium to medium-high heat. The oil is ready when a pinch of panko sizzles immediately.
- Cook the breaded chicken in batches without crowding the skillet. Flip once the bottom is deep golden brown, then continue cooking until the chicken reaches 165°F / 74°C in the thickest part.
- Transfer the cooked chicken to a wire rack set over a baking sheet. Let it rest for a few minutes so the coating stays crisp.
- In a small bowl, whisk together Worcestershire sauce, ketchup, low-sodium soy sauce, brown sugar, garlic powder, and optional vinegar until smooth.
- Slice the chicken katsu into strips just before serving. For meal prep, keep the chicken whole or store it separately from wet ingredients until ready to eat.
- Divide the cooked rice among 4 bowls. Add shredded cabbage, carrots, cucumber, edamame, avocado, and any other vegetables alongside the rice.
- Place the sliced chicken katsu on top of each bowl. Drizzle the katsu-style sauce right before eating, or serve it on the side to keep the breading crisp.
- Finish with sesame seeds, sliced green onions, chili flakes, sriracha, or optional spicy mayo right before serving.
- For meal prep, store the crispy chicken separately from the rice, vegetables, sauce, and fresh toppings. Reheat chicken with dry heat when possible for the best texture.
Notes
FAQ
Yes. Cook the chicken, rice, and vegetables, then store them in separate airtight containers. Keep the sauce and fresh toppings in their own small containers. The chicken stores best on its own rather than stacked on top of warm rice or wet vegetables. Assembled bowls keep well in the refrigerator for 3 to 4 days when stored properly.
Rest the cooked chicken on a wire rack right after frying, slice just before serving, and always keep the sauce separate until eating. Avoid placing wet vegetables in direct contact with the breading. When reheating, use an air fryer, toaster oven, or oven rather than a microwave for the best texture recovery.
Yes. Place breaded chicken on a wire rack over a baking sheet, coat the panko lightly with oil, and bake at a high temperature until the chicken reaches 165°F / 74°C and the breading is golden. An air fryer produces a result closer to pan-fried. Baked katsu will have a lighter crust than pan-fried, but it still works well in a bowl.
Shredded cabbage, sliced carrots, cucumber, green onions, edamame, and avocado all work well because they add freshness and crunch without needing to be cooked. Avoid placing wet or watery vegetables directly in contact with the breaded chicken. Keep dressed vegetables in their own section of the bowl.
Yes, always. Katsu-style sauce softens panko breading quickly. Storing sauce directly over the chicken, even in a well-sealed container, will leave the breading soft by the time you eat it. Use a small sauce cup or sealed container on the side and pour the sauce right before eating.
More Chicken Rice Bowl Ideas
If you enjoy chicken rice bowls, here are a few more to add to your rotation:
- Teriyaki chicken rice bowl for a glossy sweet-savory sauced chicken option that meal preps well
- Sticky chicken rice bowl for another pan-sauce chicken and rice combination
- Buffalo chicken rice bowl for a tangy, spicy take on the chicken rice bowl format
- Street corn chicken rice bowl for a bold, creamy bowl with a completely different flavor profile
- Ground chicken protein bowl for a simpler, faster-cooking chicken bowl alternative
If you are planning your full week around practical chicken meals, easy protein dinner ideas covers a wider range of options across different proteins and formats. And if you want a structured starting point for weekly planning, the high protein meal plan for beginners walks through how to build a repeatable weekly routine around meals like this one.